

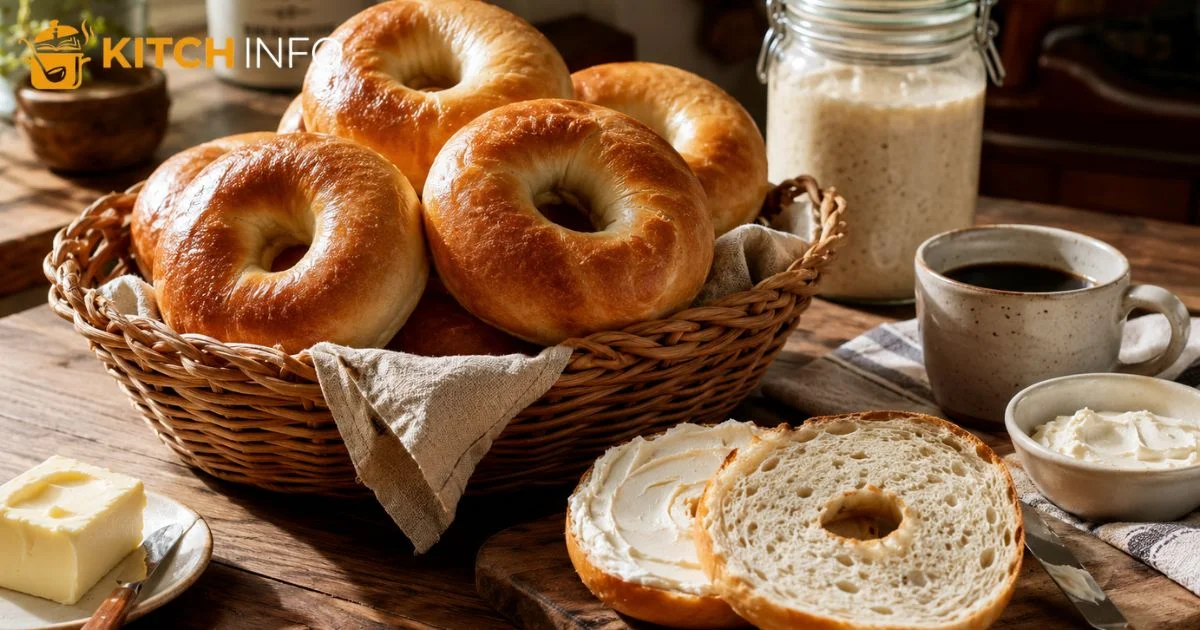
Same Day Sourdough Bagels are the perfect choice when you want fresh, bakery style bagels without waiting days for the dough to develop. This simple recipe uses an active sourdough starter to create rich flavor, a delicious chew, and a beautifully baked crust in just one day. Made with bread flour, a little all purpose flour, and the right bagel dough technique, these bagels turn out soft inside with a crisp exterior every time. Whether you are baking for breakfast, meal prep, or weekend brunch, these homemade bagels are easy to make, full of natural sourdough flavor, and perfect for topping with your favorite spreads or sandwich fillings.
Why You’ll Love These Bagels
Making bagels from scratch might sound difficult at first, but this recipe keeps the process simple while delivering bakery quality results. Every step has a purpose, helping you create bagels with great flavor and texture in just one day.
Ready in One Day
The biggest advantage of this recipe is the faster timeline. Instead of preparing an overnight dough, you complete the entire process from mixing to baking in a single day. That makes it much easier to fit homemade baking into your normal routine.
Whether you start early in the morning or after breakfast, you can enjoy freshly baked bagels before the day ends.
Wonderful Sourdough Flavor
A healthy sourdough starter gives these bagels a rich taste that is difficult to achieve with commercial yeast alone. The flavor is mild, balanced, and slightly tangy without becoming overpowering.
Because the dough rises efficiently with a strong starter, you still enjoy excellent flavor while shortening the overall fermentation time.
Perfect Texture Every Time
Great bagels should be soft inside with a satisfying bite. This recipe creates exactly that.
The outside develops a light crispy crust, while the inside stays moist with the classic chewy texture people expect from authentic bagels.
Easy Enough for Beginners
You do not need years of baking experience to succeed with this recipe.
The steps are straightforward, and each stage is explained clearly so first time bakers can feel confident from start to finish.
Flexible for Different Flavors
Once you master the basic recipe, you can create countless bagel varieties.
From savory toppings to sweet additions, these bagels can match almost any breakfast or snack preference.
Better Than Many Store Bought Bagels
Freshly baked bagels have a flavor and texture that packaged products often cannot match.
Making your own also lets you control the ingredients and avoid unnecessary preservatives while enjoying warm bread straight from your own kitchen.
Ingredients You’ll Need

Simple ingredients come together to create bagels with outstanding flavor and texture. Using quality ingredients and measuring them carefully will give you consistent results every time.
| Ingredient | Purpose |
| Bread flour | Provides structure and chew |
| All purpose flour | Softens the dough slightly while keeping it easy to handle |
| Water | Hydrates the dough |
| Active sourdough starter | Leavens the bagels naturally |
| Honey | Adds gentle sweetness and supports browning |
| Fine sea salt | Balances flavor and strengthens dough |
Bread Flour
High protein bread flour is one of the secrets behind authentic bagels.
The extra protein creates stronger gluten, making the dough sturdy enough to develop the signature bite people expect.
All Purpose Flour
A small amount of all purpose flour helps balance the texture.
Using both flours creates dough that is easier to work with while still producing classic bagels.
Water
Simple water hydrates the flour and allows gluten to develop.
The temperature matters. Slightly warm water works well because it helps the dough come together comfortably without overheating the starter.
Active Sourdough Starter
Your active sourdough starter should be bubbly and recently fed before mixing.
A healthy starter provides natural lift, improves flavor, and supports steady fermentation throughout the day.
Honey
A little honey adds subtle sweetness while helping create beautiful browning during baking.
It also contributes to the rich flavor that makes homemade bagels so satisfying.
Fine Sea Salt
Fine sea salt strengthens the dough and brings all the flavors together.
Even a small amount makes a noticeable difference in the finished bagels.
Same Day Sourdough Bagels Recipe

Making bagels becomes much easier when you break the process into simple stages. Follow each step carefully and allow the dough enough time to develop naturally.
Gather Your Equipment
Having everything ready before mixing keeps the process smooth.
You will need a mixing bowl, kitchen scale, measuring cup, stand mixer, dough hook, bench scraper, spatula, tea towel, stockpot, mesh strainer, baking sheet, and parchment paper.
Preparing your tools first also helps you stay organized throughout the day.
Step 1. Feed the Starter
Several hours before mixing, feed starter so it reaches peak activity.
A mature starter should have plenty of bubbles, smell pleasantly tangy, and nearly double in size before you begin.
This is one of the most important steps for successful same day bagels.
Step 2. Mix the Dough
Place the flour, starter, honey, salt, and water into your bowl and mix dough until everything comes together.
The mixture will feel firm rather than sticky. That is exactly what you want because bagels require a stiff dough.
The lower dough hydration helps create their classic texture after baking.
Step 3. Knead the Dough
Use your mixer with the dough hook attachment or knead dough by hand.
Continue until the dough becomes smooth, elastic, and strong.
If you press it gently, it should spring back instead of remaining flat.
Step 4. Bulk Fermentation
Cover the bowl and allow bulk fermentation to begin at room temperature.
The exact timing depends on the strength of your starter and the temperature in your kitchen.
During this stage, the dough should become lighter and more relaxed while slowly expanding.
Step 5. Watch for the First Rise
Instead of focusing only on the clock, observe the dough itself.
The first rise is complete when the dough becomes slightly puffy and has increased noticeably in size.
A very active starter may shorten this stage, while cooler kitchens may require extra time.
Step 6. Divide the Dough
Lightly flour your work surface and divide dough into equal portions.
Using a scale keeps every bagel the same size, helping them bake evenly.
Each portion should become one of your future dough balls.
Step 7. Shape the Bagels
Now it is time to shape bagels.
Roll each portion into a smooth ball, then create a hole in the center using your finger. Gently stretch the opening until it is large enough because it will shrink slightly as the dough rises.
Proper shaping bagels technique creates even circles that bake beautifully.
Step 8. Second Rise
Place the shaped bagels onto a prepared tray lined with parchment.
Cover them lightly and allow the second rise to continue until they look slightly puffier.
Do not overproof them because they should still hold their shape well before boiling.
Step 9. Prepare the Water Bath
While the bagels finish proofing, fill a large pot with boiling water.
This water bath is one of the defining steps in traditional bagel making.
Many bakers add a little granulated sugar to the water because it supports better browning during baking.
Step 10. Boil Before Baking
Carefully boil bagels for a short time on each side.
This process of boiling before baking creates the classic crust by forming a thin layer of gelatinous starch on the surface.
That unique layer later develops into the familiar glossy finish after baking.
Step 11. Add Toppings
Once boiled, transfer the bagels back to the prepared tray.
This is the perfect time to sprinkle your favorite bagel toppings before they go into the oven.
Step 12. Bake
Always preheat oven before baking.
Place the tray inside and bake until the bagels become deeply golden brown with a naturally shiny exterior.
Allow them to cool completely before slicing.
Although they smell amazing right away, waiting helps the inside finish setting for the best texture.
Sample Baking Timeline

One reason people enjoy this recipe is that it fits comfortably into a normal day.
The schedule below is only a guide. Your exact timing may change depending on your starter strength, kitchen temperature, and overall fermentation conditions.
| Time | Activity |
| 7:00 AM | Feed the starter |
| 10:00 AM | Mix and knead the dough |
| 10:30 AM | Begin proofing |
| 1:30 PM | Divide and shape the dough |
| 2:00 PM | Final proof |
| 3:00 PM | Boil and top the bagels |
| 3:30 PM | Bake |
| 4:00 PM | Cool before serving |
Adjusting for Your Kitchen
Every kitchen behaves differently.
If your home is warm, the dough may reach the desired volume sooner.
If you are baking during cooler weather, allow additional time rather than rushing the process.
On days with high humidity, the dough may also feel slightly softer, so handle it gently while shaping.
Best Toppings and Flavor Variations

One of the best things about homemade bagels is the endless opportunity to customize them.
You can keep them plain or create exciting flavors for every member of the family.
Classic Savory Choices
Traditional toppings remain favorites because they complement the rich sourdough flavor.
Popular choices include sesame seeds, poppy seeds, Everything Bagel Seasoning, and shredded cheese.
Each creates a slightly different texture and flavor after baking.
Sweet Flavor Ideas
If you enjoy sweeter breakfasts, add cinnamon and raisins directly into the dough before shaping.
These flavors pair wonderfully with cream cheese or butter.
Breakfast Sandwich Favorites
Fresh bagels make excellent breakfast sandwiches.
Try serving them with cream cheese, eggs, bacon, sausage, ham, turkey, cheddar, or fresh avocado for a satisfying meal.
Kid Friendly Options
Children often enjoy sweeter combinations.
Spread peanut butter over a toasted bagel and top with sliced banana, or enjoy a simple layer of Nutella for an occasional treat.
Lunch and Dinner Ideas
Bagels are not limited to breakfast.
They also work well as sandwich bread or even as pizza bagels, making them a convenient option for quick family meals.
As you become more comfortable with the recipe, you can experiment with even more flavors while keeping the same reliable dough and baking process. In the next part, we will cover storage methods, freezing tips, reheating, troubleshooting, and answers to common questions so you can enjoy perfect bagels every time.
Tips for Perfect Results
Small details can make a big difference when baking bagels at home. These practical tips will help you get consistent results every time.
Measure Ingredients Carefully
Using accurate measurements keeps the dough balanced. A digital scale is more reliable than measuring by volume and helps create the same results from batch to batch.
Give the Dough Enough Time
Natural rising depends on many factors, including the strength of your starter and the temperature in your kitchen.
Instead of watching the clock, pay attention to how the dough looks and feels. It should become light and airy before moving to the next step.
Do Not Skip the Boiling Step
The quick boil is what separates a true bagel from regular bread.
Without it, the finished bagels will not develop the familiar chewy outside that makes them so enjoyable.
Leave Space Between Bagels
Arrange the shaped dough with enough room on the baking pan.
This allows hot air to circulate evenly so every bagel bakes with consistent color and texture.
Let Them Cool Before Slicing
Fresh bagels continue to finish cooking inside after they leave the oven.
Waiting a short time before cutting helps preserve the soft interior and prevents a gummy texture.
How to Store and Freeze Bagels

Fresh homemade bagels taste best on the day they are baked, but proper storage keeps them delicious for days.
Storing at Room Temperature
Place cooled bagels in a sealed bag or airtight container.
They stay fresh for about two days when kept on the counter away from direct sunlight.
Avoid refrigerating them because refrigeration can make bread become stale more quickly.
Long Term Freezing
If you have extra bagels, freezing is an excellent option.
Place them in a freezer safe container after they have cooled completely. You can also wrap each bagel individually with plastic wrap before placing them into the container for added protection.
This is an easy way to freeze bagels without losing quality.
Thawing and Reheating
Remove a bagel from the freezer whenever you need one.
Allow it to thaw at room temperature or warm it directly from frozen.
For the best flavor, lightly reheat it until warmed through.
A regular toaster works well for sliced bagels, while a toaster oven is a great choice for warming whole bagels with a crisp outside.
With proper storage, you can always store bagels for quick breakfasts and snacks throughout the week.
Common Mistakes to Avoid
Even simple recipes can have a few challenges. Knowing what to avoid will help you bake with confidence.
| Mistake | Better Approach |
| Using a weak starter | Wait until it is fully active before mixing |
| Adding too much flour | Measure carefully and avoid making the dough too dry |
| Rushing the rising process | Let the dough develop naturally |
| Skipping the boil | Always boil before baking for classic texture |
| Overbaking | Remove the bagels once they are deeply browned |
Starting With an Unready Starter
A starter that has not reached peak activity may not provide enough lift.
If it looks flat or inactive, give it more time before beginning the recipe.
Overproofing the Dough
Too much rising can cause the bagels to lose their structure.
When they become overly soft, they may flatten during baking instead of holding a nice round shape.
Making the Center Hole Too Small
The opening naturally shrinks during baking.
Creating a generous hole while shaping helps the finished bagels keep their classic appearance.
Baking Too Long
Every oven is slightly different.
Watch the color carefully during the final minutes and remove the bagels once they have developed a rich golden finish.
Final Thoughts
Making Same Day Sourdough Bagels at home is easier than many people expect. With a healthy starter, quality ingredients, and a simple step by step process, you can enjoy fresh bagels without waiting several days.
This recipe delivers everything people love about traditional bagels, including a flavorful interior, a satisfying chew, and a beautifully browned crust. It is also flexible enough to fit different tastes, whether you prefer classic toppings, sweet flavors, or hearty sandwich fillings.
As you bake this recipe more often, you will become even more comfortable with the timing and handling of the dough. Small adjustments based on your own kitchen will help you create consistently excellent results.
Whether you are baking for your family, preparing breakfasts for the week, or simply enjoying the experience of homemade bread, these same day sourdough bagels are a reliable recipe you will return to again and again.
FAQS
Is same day sourdough possible?
Yes, same day sourdough is possible by using a strong, active sourdough starter and a well planned baking schedule.
How to make sourdough bagels in one day?
Use an active sourdough starter, allow the dough to rise properly, boil the bagels, then bake them until golden brown.
Does anybody make sourdough bagels?
Yes, many home bakers, artisan bakeries, and some specialty bagel shops make sourdough bagels.
Does Panera Bread have sourdough bagels?
No, Panera Bread does not typically offer sourdough bagels on its regular menu.
Are sourdough bagels healthier than regular bagels?
Sourdough bagels may be easier to digest and can have a lower glycemic impact due to natural fermentation, but nutrition also depends on the ingredients used.

Muhammad Ali writes about baking and recipes at kitchinfo. He researches techniques from trusted bakers, cookbooks, and culinary experts, and turns them into clear, step-by-step guides . so bakers of every skill level can get great results without the confusion.