

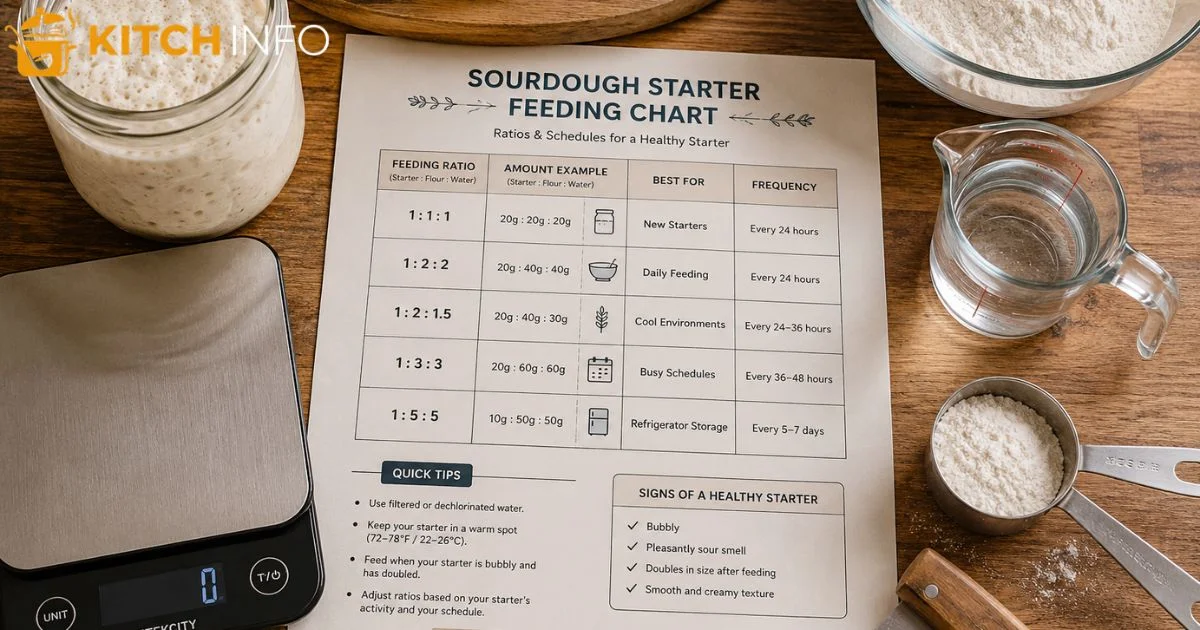
A sourdough starter feeding chart is the easiest way to keep your sourdough starter healthy, active, and ready for baking. It helps you understand the right feeding ratio, feeding schedule, and timing based on your baking routine and storage method. Whether you keep your starter on the countertop or in the refrigerator, following a simple chart ensures proper sourdough feeding and consistent results. A well fed starter develops strong fermentation, reaches its peak at the right time, and produces delicious sourdough bread with excellent flavor and texture. This guide explains everything you need to know about using a sourdough starter feeding chart to maintain a reliable starter with confidence.
What Is a Sourdough Starter?
A sourdough starter is a living mixture made from flour and water. As it sits over time, naturally occurring microorganisms grow inside the mixture. These tiny organisms create the gas that helps bread rise and develop its well known flavor.
Unlike commercial yeast, a starter relies on naturally occurring wild yeast that already exists in the environment and in the flour itself. These organisms work together with helpful bacteria to create a stable culture that can last for many years when properly cared for.
Because it is alive, your starter changes throughout the day. It becomes more active after feeding, reaches its highest point, and then slowly settles back down as it uses the available food.
What Happens Inside the Starter?
Every feeding provides fresh nutrients for the microorganisms. As they consume those nutrients, bacterial activity and yeast activity increase together.
During this process, fermentation produces carbon dioxide, organic acids, and many flavor compounds. These natural changes are what give homemade bread its unique taste and texture.
As the culture develops, it reaches peak fermentation, which is usually the best time to mix bread dough.
Signs of a Healthy Starter
Learning to observe your starter is just as important as following a schedule.
A healthy starter usually has these characteristics.
- Pleasant fresh aroma with mild tanginess
- Plenty of bubbles throughout the mixture
- Noticeable increase in size after feeding
- Smooth texture without mold
- Consistent performance from one feeding to the next
A mature culture becomes more predictable over time, making baking much easier.
Why Feeding Your Starter Is Important
Feeding replaces the food that the microorganisms have already consumed. Without fresh flour and water, the culture gradually weakens and becomes too acidic to perform well.
Regular feeding keeps the microorganisms balanced and supports long term starter maintenance.
When you feed your starter consistently, you encourage strong growth, reliable rising power, and better flavor development.
It Keeps the Culture Strong
Every feeding refreshes the microorganisms by providing new nutrients.
A well fed culture remains energetic and develops into an active starter that performs reliably during baking.
It Improves Bread Quality
The condition of your starter directly affects your finished loaf.
A strong culture supports better dough fermentation, leading to improved structure, flavor, and oven spring.
When the starter is weak, the bread may rise slowly or unevenly.
It Creates Predictable Baking Results
One of the biggest advantages of regular care is consistency.
Instead of guessing when the culture is ready, you can follow a routine and know almost exactly when it will reach its highest activity.
This makes planning your baking day much easier.
It Reduces Common Problems
Many beginner issues come from irregular feeding rather than difficult recipes.
Proper care helps prevent unpleasant smells, slow rising, excessive sourness, and poor loaf volume.
Understanding Sourdough Feeding Ratios
One of the most useful concepts in sourdough baking is the feeding ratio. This tells you how much existing starter, fresh flour, and water you combine during each feeding.
Ratios are usually written in three numbers.
Starter
Flour
Water
For example, a ratio of 1 to 1 to 1 means equal amounts of each ingredient by weight.
Using a consistent starter feeding ratio creates predictable results because every feeding begins with the same balance.
Why Ratios Matter
Changing the ratio affects how quickly the starter matures.
Smaller feedings provide less food, so the starter becomes active sooner.
Larger feedings provide more nutrients, allowing the culture to stay active for a longer period.
Understanding this relationship helps you match your feeding routine to your personal baking schedule.
Common Feeding Ratios
| Ratio | Example in Grams | Best Use |
|---|---|---|
| 1 to 1 to 1 | 50 g starter 50 g flour 50 g water | Daily maintenance |
| 1 to 2 to 2 | 25 g starter 50 g flour 50 g water | Longer activity window |
| 1 to 3 to 3 | 20 g starter 60 g flour 60 g water | Warm kitchens or delayed baking |
| 1 to 5 to 5 | 10 g starter 50 g flour 50 g water | Preparing for overnight development |
These examples are easy to scale depending on how much starter you need.
Choosing the Right Ratio
There is no single perfect ratio.
Your choice depends on several factors including room conditions, baking plans, and how quickly you want the starter to mature.
A warmer kitchen speeds up growth, while cooler conditions slow it down.
Sourdough Starter Feeding Chart
The chart below provides a simple reference for common feeding situations.
| Goal | Ratio | Approximate Time Until Peak |
|---|---|---|
| Daily baking | 1 to 1 to 1 | 4 to 6 hours |
| Moderate schedule | 1 to 2 to 2 | 6 to 8 hours |
| Warm kitchen | 1 to 3 to 3 | 8 to 12 hours |
| Overnight refresh | 1 to 5 to 5 | 10 to 14 hours |
These times assume average room temperature found in most American homes.
Remember that every kitchen is different. Temperature, flour type, and the condition of your culture all influence timing.
How to Read the Chart
The first number represents the amount of existing starter.
The second number represents fresh flour.
The third number represents fresh water.
For example, a ratio of 1 to 2 to 2 means every one part starter receives twice as much flour and twice as much water.
Following these proportions is more important than using exact quantities.
Adjusting for Your Baking Plans
If you bake frequently, smaller feedings are often enough.
If you bake less often or expect a long wait before mixing dough, larger feedings help maintain activity for a longer period.
Over time, you will naturally adjust your routine based on experience.
Ingredients Needed for Feeding
Keeping your feeding routine simple is usually the best approach.
Only a few basic ingredients and tools are needed.
Flour
Most bakers begin with unbleached all purpose flour because it is easy to find throughout the United States.
Whole wheat flour can also provide extra nutrients and encourage faster microbial growth.
Many experienced bakers use a combination of both.
Water
Clean drinking water works well in most homes.
If your tap water contains a strong chlorine smell, filtered water may produce more consistent results.
Digital Scale
A digital scale is one of the best investments for sourdough baking.
Measuring by weight gives much greater accuracy than measuring with cups.
Using grams measurement also makes recipes easier to scale up or down.
Starter Jar
A clear starter jar makes it easy to monitor growth throughout the day.
Straight sided containers also help you see exactly how much the starter has expanded after feeding.
How to Feed a Sourdough Starter

Learning the feeding process takes only a few minutes.
Once it becomes a habit, daily care feels quick and simple.
Step 1
Begin by keeping only the amount of carryover starter needed for your chosen ratio.
This prevents the culture from growing too large.
Step 2
Measure fresh flour and water according to your selected ratio.
Using accurate measurements keeps future results consistent.
Step 3
Mix everything thoroughly until no dry flour remains.
The texture should look smooth and evenly combined.
Step 4
Cover the container loosely.
Air should still be able to move while preventing dust from entering.
Step 5
Leave the starter at room temperature until it becomes fully active.
During this period, the microorganisms consume the fresh food and produce gas.
Watching the Rise
As activity increases, you will notice the starter rise gradually.
Many starters eventually double in volume before slowly settling back down.
This visual change is often more useful than watching the clock.
Looking for Bubbles
A bubbly starter usually indicates healthy microbial activity.
Large and small bubbles throughout the mixture show that fermentation is progressing well.
Texture Changes
Freshly mixed starter is usually thick.
Later, it may develop a light foamy surface as gas collects near the top.
Some starters become slightly runny starter mixtures after reaching their highest point, which is completely normal.
Knowing When It Is Ready
Your starter peak is the highest point before it begins falling.
This is often when the culture is starter ready to use for many bread recipes.
Using it at this stage usually provides excellent rising strength.
How Often Should You Feed Your Starter?
There is no universal answer because every baker has different goals.
Your ideal feeding frequency depends on how often you bake, where you store the starter, and how warm your kitchen is.
Daily Bakers
If you bake several times each week, feeding once or twice each day usually keeps the culture strong and predictable.
This routine works well for countertop storage.
Occasional Bakers
If baking is limited to weekends, refrigeration often becomes the simplest solution.
Less frequent feeding still maintains a healthy culture while reducing daily work.
Factors That Affect Timing
Several conditions influence fermentation speed.
Kitchen temperature
Flour choice
Hydration level
Amount of starter used
Feeding ratio
These variables also affect overall fermentation time, so expect small differences from one kitchen to another.
Feeding Schedule for Counter Storage

Keeping your starter on the kitchen counter is convenient for frequent baking.
This approach requires regular care because the culture stays active all the time.
A consistent starter feeding schedule helps maintain stable performance.
Sample Daily Routine
Morning
Feed the starter.
Allow it to become active during the day.
Evening
Bake if needed or feed again before bedtime.
This schedule works well for many home bakers who prepare fresh bread every few days.
Benefits of Countertop Storage
Countertop storage keeps the starter ready for baking without requiring advance planning.
It also allows you to observe changes more easily and become familiar with its normal behavior.
Feeding Schedule for Refrigerator Storage
Many home bakers prefer fridge storage because it greatly reduces maintenance.
Cool temperatures slow microbial activity, allowing the culture to remain healthy between feedings.
Weekly Routine
Remove the starter from refrigerator storage.
Allow it to warm slightly.
Feed it using your preferred ratio.
Let it become active before returning it to the refrigerator if you are not baking immediately.
Preparing for Baking
Before mixing bread, many bakers refresh the culture one or two times at room temperature.
This helps produce a strong mature starter with reliable performance.
If you notice an acidic starter, an over fermented starter, or a sluggish starter, a few regular feedings at room temperature usually restore balance.
Likewise, an underfed starter often responds well to fresh flour and water given at consistent intervals.
As you become comfortable with these feeding routines, the next step is learning how to manage extra starter, calculate exact quantities for different recipes, and adapt feeding methods to fit every baking schedule.
How Temperature Affects Feeding Frequency
Temperature has a direct impact on how quickly your starter uses its food. Warmer conditions speed up growth, while cooler conditions slow everything down.
If your kitchen stays warm for most of the day, your starter may need fresh food sooner than expected. In a cooler home, it may take several more hours before it reaches full activity.
For many home bakers in the United States, indoor temperatures change with the seasons. During summer, you may need to feed more often. During winter, you can usually allow more time between feedings.
Instead of following the clock alone, watch how your starter behaves. Its rise and texture are often the best guides for deciding when the next feeding is needed.
How to Know When Your Starter Is Ready
Using your starter at the right moment helps produce better bread with a lighter texture and more consistent results.
One of the easiest signs is a full rise. The starter should expand noticeably and hold its shape before it begins to fall.
It should also have plenty of bubbles throughout the mixture and a pleasant fresh aroma that is slightly tangy without smelling harsh.
Another helpful sign is its consistency. The mixture should feel light and airy rather than dense.
When these signs appear together, your starter is usually ready for baking.
Signs of a Healthy Sourdough Starter

A well cared for starter behaves consistently from one feeding to the next.
Look for these signs.
- It rises well after every feeding.
- It contains bubbles throughout the jar.
- It has a fresh, clean smell.
- It keeps a smooth texture without discoloration.
- It performs predictably each time you bake.
Regular observation helps you notice small changes before they become larger problems.
Common Feeding Mistakes to Avoid
Many sourdough problems come from a few simple mistakes. Avoiding them makes caring for your starter much easier.
Guessing Measurements
Eyeballing ingredients can lead to inconsistent results. Measuring carefully each time keeps your routine reliable.
Feeding Too Soon
Adding fresh flour before the starter has finished its cycle can reduce consistency. Allow it enough time to develop between feedings.
Waiting Too Long
Leaving the starter without fresh food for extended periods weakens the culture and may affect future baking performance.
Changing Too Many Things
If your starter seems different, avoid changing flour, feeding amounts, and timing all at once. Adjust one factor at a time so you can see what works best.
Troubleshooting Feeding Problems

Even experienced bakers occasionally notice changes in their starter. Most issues are easy to fix with a little patience.
Slow Growth
If your starter rises more slowly than usual, try placing it in a slightly warmer location and continue feeding on a consistent schedule.
Excess Liquid
A layer of liquid on top usually means the starter has used up its available food. Stir it in or pour it off, then give the starter a fresh feeding.
Weak Baking Performance
If your bread does not rise as expected, refresh the starter several times before baking again. Regular feedings often restore strength within a few days.
Strong Sour Smell
A very sharp aroma usually means the starter has gone too long without fresh food. Returning to a steady routine typically improves both smell and performance.
Adjusting Your Feeding Routine
Your feeding routine should fit your baking habits rather than follow a strict rule.
If you bake every week, keep a schedule that matches those baking days. If your plans change, adjust the feeding ratio or feeding time to match your new routine.
It is also helpful to plan ahead before holidays or busy workweeks. A small adjustment in advance can keep your starter healthy without unnecessary effort.
With experience, you will learn how your own kitchen environment affects the starter. That personal knowledge is often more valuable than following any single chart.
Printable Feeding Schedule
The table below provides a simple reference that you can save or print for everyday use.
| Baking Habit | Storage Method | Suggested Feeding Routine |
|---|---|---|
| Several times each week | Counter | Feed every day |
| Once each week | Refrigerator | Feed once before storing and refresh before baking |
| Every few weeks | Refrigerator | Feed before storage and refresh with one or two feedings before use |
| Occasional baking | Refrigerator | Check regularly and refresh before planned baking sessions |
Keeping this schedule nearby makes it easier to stay consistent throughout the year.
Final Thoughts
A simple feeding routine is the foundation of successful sourdough baking. Once you understand how your starter responds to time, temperature, and regular care, the process becomes easy to manage.
Using a dependable sourdough starter feeding chart removes much of the guesswork and helps you build confidence with every loaf. Instead of worrying about exact timing, focus on observing your starter and following a consistent routine that matches your baking schedule.
Over time, you will recognize its patterns, know when it is ready to bake with, and make small adjustments as needed. With regular care and a little patience, your starter can remain healthy for years, providing reliable results and delicious homemade sourdough whenever you are ready to bake.
FAQS
What is the best feeding schedule for a sourdough starter?
Feed daily at room temperature or once a week if stored in the refrigerator.
What is the best feeding ratio for my sourdough starter?
A 1:1:1 ratio is best for regular maintenance, while 1:2:2 provides longer-lasting activity.
What does an overfed starter look like?
An overfed starter may rise slowly, have fewer bubbles, and take longer to become active.
Should you feed starters 1:1:1 or 1:2:2?
Use 1:1:1 for daily baking and 1:2:2 when you need a longer feeding interval.
Should I stir my sourdough starter between feedings?
No, there is usually no need to stir it between feedings unless a layer of liquid forms on top.

Muhammad Ali writes about baking and recipes at kitchinfo. He researches techniques from trusted bakers, cookbooks, and culinary experts, and turns them into clear, step-by-step guides . so bakers of every skill level can get great results without the confusion.